Monday 18 May 2015

Configuring a Data Source For Java EE Applications

In this tutorial you'll learn how to configure a Data Source (Database) for your application . I will be using the Java Persistence API  to demonstrate the examples.  What this API does is that it simply helps you to map Entity Beans (Special Java Bean) to tables in your database. It also helps you to define relationships e.g one to many between tables. In this tutorial, ill only show you how to use its high level features. Here is a nice Java Persistence Tutorial by Oracle  for further reading.

Step 1 : Create Database
  
Start  MySQL server (or any DB server)  and create a database called UserReg. For MySQL users , you can use phpmyadmin that comes with XAMPP or WAMP to do this quickly


Step 2 :  Create a Persistence Unit


  1. Right click on source packages in your project and select "New > Persistence Unit". You'll see a window similar to the screen shot below;


2. Type in the persistence unit name as shown above.

3. Next you need to create a data source. This is the database you created earlier in step 1 above. Select the Data Source drop down  and click "New Data Source". You'll see a window similar to the one shown below.


4 . Type in the JNDI Name as jdbc/userreg . In the Database Connection drop down, select "New Database Connection". You'll see a window similar to the one shown below.


5 . Since we are using MySQL DBMS, select "MySQL(Connector/J Driver) Driver" and click Next. You'll see a window similar to the one shown below.


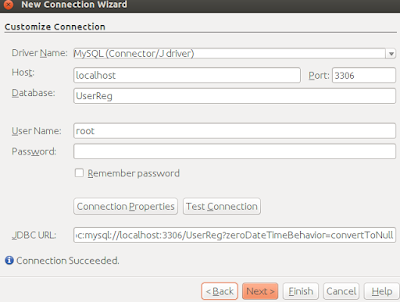
6. Enter the name of the database you created in Step 1 Above. In this case "UserReg" , enter user name and password of your database and click "Test Connection". On successful connection you'll see a window similar to the one below.


7 . Click Finish . This should take you back to the window in step 3 above. You'll see your database connection URL is selected on the Database connection drop down as shown below.


8. Click Ok to return to the persistence wizard window as shown below.


9 ) Click finish to complete and close the persistence unit wizard. 

Congrats ! You've successfully configured a data source for your application.In the next tutorial, ill show you how to write code that will persist/insert users into your new DB. 


How to create a simple Java EE Web Application using JSF Framework

   This beginner's  tutorial is meant for Java programmers who want to dive into JavaEE web application programming using the JSF Framework. JavaEE is Oracle's Enterprise computing platform .  With JavaEE you are able to develop network and web services, and other large-scale, multi-tiered, scalable, reliable, and secure network applications.

  JSF stands for Java Server Faces and it is a user interface (UI) framework for Java web applications. It is designed to significantly ease the burden of writing and maintaining applications that run on a Java application server and render their UIs back to a target client. 

    In this tutorial, i will show you how to create a simple JavaEE user registration web application that persists(inserts) user details into a database. For starters, I'll use MySQL DBMS and NetBeans IDE.

WHAT YOU NEED
  • Download and install Java Development Kit (JDK) from here 
  •  Download and install the latest version of  NetBeans  
  • MySQL DBMS .
  • Some Java Programming Experience
 Once you've installed the above, you'll realize that NetBeans comes with the latest Glass-fish application server bundled . All of your web applications will be deployed on this server. Luckily, NetBeans does this for you , but as you become more experienced with JavaEE, you will need to know how to configure various application servers like Apache Tomcat, JBOSS e.t.c

Next you'll learn how to create a JavaEE web project
   

Creating a Java EE Web Project

 In this tutorial you'll learn how to create a Java EE project .

1)  Open NetBeans , Select File > New Project 


2)   Under Categories select "Java Web" and under Projects select "Web Application" as shown above and click "Next".  In the window enter your preferred project name, in this case we use "UserReg" , select where to store your project or leave it to store in the default NetBeans folder and click Next. 


 3) In the next window , make sure that Glassfish is selected as the default server.

 4) Select "Java EE 6 Web"  as JavaEE version

 5)  Check "Enable Contexts and Dependency Injection " ( I'll this explain later) check box and click  "Next"


 6 ) Since we'll be using the JSF Framework, select "Java Server Faces"  check box under frameworks in the next window. and  Click  "Finish"  .


Congratulations !  now you've created your first Java EE project , now you'll learn how to Configure a Data Source (Database) .